Getting Started With Rising Goal
From the onboarding process to the OKR cycleGetting Started With Rising Goal
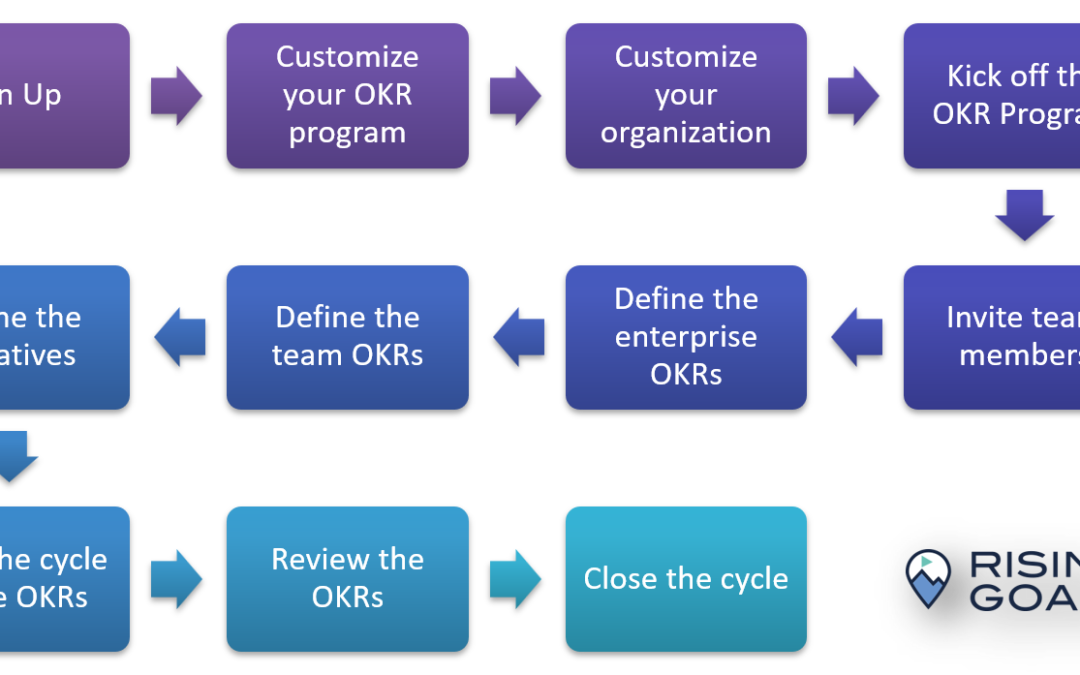
Overview of the onboarding process
You want to start your OKR journey? And more particularly by guiding you with the Rising Goal solution? However, you don’t know where to start.
So, let’s help you with this practical, step-by-step guide from the onboarding on Rising Goal to the OKR cycle.

Step 1
Sign Up
During the sign up process, you create your organization and your first team. You have the role of administrator of this organization. Therefore, you will be able to customize the organization and governance of your OKR program. You will be able to invite people and manage user roles. This role can be changed later.

You will receive an email to confirm your account

Create your organization and your first team

You start a pilot?
If you have an agreement with Rising Goal to start a pilot project, you must contact us at this stage. So that we configure your organization to have no constraints on the number of users and to have a full access to all features.
Contact us via the chatbox, email team@risinggoal.com or the contact page.
Sign up for Rising Goal
Step 2
Customize your OKR Program
Customizing your OKR Program is essentially a question of defining the OKRs cycles that you are going to use in your organization. You can read more info about OKR cycles.
Go to Cycle Management
Select the OKR menu. Then click on the 3-dot menu in front of the list of cycles. Click on the Cycle Management item.
Set up your OKR Cycles
By default, the OKR cycle is enabled. You can switch off this option if you don’t want cycles.
You can either manually set your OKR cycles or choose to let the solution manage them automatically. Just set the frequency of each cycle.


Typically, an organization has an annual strategic cycle and a quarterly tactical cycle.
Step 3
Customize your organization

In the Organization menu, you will define the departments and teams of your organization.
Also, in the integrations tab, you will be able to create an API token to use the Rising Goal API. You will be able to connect your account with JIRA in this section.
Step 4
Kick off the OKR Program
Communicate to your employees about the OKR program
- The why, the how and the what.
- If needed, train your teams in OKRs
Schedule a demo of Rising Goal for team members
Since the next step is to invite your collaborators to the Rising Goal platform, it is a good time to schedule a demo with our product expert.
This will be an opportunity to clarify certain methodological points if necessary.
Schedule your demo
Step 5
Invite Team Members
To collaborate, you must now invite your colleagues to your new organization. There are two ways to do this:
First invite team leaders
Select the menu Organization > Users.

In the Users tab, click the Add button, enter an email, select Pending Status, select a role (administrator, member, guest) and click the Update button. The team member will then receive an invitation email.
Then, team leaders invite their team members
Select the menu Organization > Teams > Members

In the Teams tab, select the team you want to manage.

Invite a team member
The team member is not yet registered, you can invite them to join the team. He will receive an invitation email with a link. He will automatically be added to the team when he register.
Add a team member
The team member has already registered, you can add them to the team.

Step 6
Define corporate (strategic) OKRs
It’s time to create your own OKRs. If you have a strategic cycle in place, you will start by defining your corporate OKRs.
Learn more about OKRs.
Start by creating your first objective, in the menu Manage > OKR:

- Select your cycle in the list. In the example, our strategic cycle is annual, we select 2022.
- Click on the button Create New Objective

Then create your first key result:
After creating your objective, you can add several key results. Drill down your objective.
- Click on the + button in the OKR tab
- Click on the button + Key Result


Step 7
Define teams (tactical) OKRs
With your strategic OKRs defined, it’s time for teams to create (and align) their own tactical OKRs. Learn more about OKR alignement.
There are different ways to do it.
For the first way, select the menu Manage > OKR:

- Select the diagram layout
- Right click on the strategic objective
- Click Add an Objective menu
- Create the team OKR

Then, in the objective creation window:
- Select the right cycle (2022 Q1 for example)
- Select the right team (My Team for example)
For the second way to define aligned objective:
- Select the list layout
- Select the contextual menu of the strategic objective
- Click on the button + Aligned Objective

Step 8
Define your initiatives
An OKR is not actionable. It is a direction with measurable outcomes. To achieve your goal, you need a plan of action. It’s time for you and your teams to define a set of initiatives for their OKRs.
In the Manage > OKR menu
1.Click on the link of the objective (or key result) or select the Manage contextual menu
2.Click on the menu + Initiative


Step 9
Start the OKR Cycle
You have defined your OKR cycles, you have defined your OKRs at different levels. You are ready to start your first cycle.
In the menu Manage > OKR
1.Select your cycle in the list
2.Click on the button Start of the contextual menu of the cycle

Step 10
Start the OKRs
When you are ready, start each OKR, from the board directly:
In the menu Manage > OKR:
1.Select the Kanban layout
2.Drag & drop the Objective, the Key Result or the initiative in the In progress column

There is a second way to start an OKR.
1. Select the Manage menu of the Objective or Key Result
2. Click on the button Start the Objective

Step 11
Check-Ins & Reviews
Regularly, you will do check-ins of your Key Results and review your objectives.
You can use the check-in / review contextual menu of the OKR.
In the menu Manage > OKR > Objective
If the OKR is started, you have access to the ⊕ button to create an objective review or a key result check-in.


Step 12
Close the OKR cycle
Finally, the cycle ends. Your OKRs are finished. It’s time to close the cycle.
In the menu Manage > OKRS
1.Select your cycle in the list
2.Click on the button Close of the cycle contextual menu

Now is the time to analyze the performance of your OKRs over time, in the report section.

Getting Started With Rising Goal
Conclusion
We hope this practical guide has helped you getting started with Rising Goal App and with your OKR program.
Still have questions?
Contact us via the chatbox, email team@risinggoal.com or the contact page. We will be happy to help you on your OKR journey.

Recent Comments